Choose cross or isolated margin mode
Selecting the right margin mode is the first step in managing onchain perp margin efficiently. The choice determines how much capital is at risk when a single position moves against you. Most perpetual DEXs support both cross and isolated margin, allowing traders to adjust their risk exposure based on their portfolio size and tolerance.
How isolated margin works
Isolated margin places the funds you assign to a trade into its own dedicated block. That allocation applies only to that specific position. If the trade hits its liquidation price, only the isolated funds are lost. Your remaining wallet balance stays untouched.
This mode is ideal for high-leverage trades or speculative entries where you want to cap your downside. It prevents a single bad bet from draining your entire account.
How cross margin works
Cross margin pools your entire available balance as collateral for all open positions. If one position starts losing value, the system can use funds from other positions or your idle balance to keep the trade open. This lowers the likelihood of immediate liquidation during temporary volatility.
However, cross margin carries higher risk. A severe market move can liquidate your entire account balance, not just the funds allocated to the losing trade. It is best suited for lower-leverage, long-term positions where you want to maximize capital efficiency.
Side-by-side comparison
| Feature | Isolated Margin | Cross Margin |
|---|---|---|
| Risk Exposure | Limited to allocated amount | Entire wallet balance at risk |
| Liquidation Price | Higher (easier to hit) | Lower (harder to hit) |
| Capital Efficiency | Lower (funds locked per trade) | Higher (shared collateral) |
| Best For | High-leverage, speculative trades | Low-leverage, long-term positions |
| Complexity | Simple to manage | Requires careful monitoring |
Which mode should you choose?
If you are new to onchain perp margin or trading with high leverage, start with isolated margin. It provides a clear boundary around your risk, making it easier to manage losses without affecting your overall portfolio. As you gain experience and develop a robust risk management strategy, you can experiment with cross margin for more efficient capital use.
Quick checklist for margin mode selection
-
Assess your risk tolerance: Can you afford to lose your entire wallet balance?
-
Determine your leverage: Higher leverage favors isolated margin.
-
Evaluate your portfolio size: Larger portfolios may benefit from cross margin's efficiency.
-
Monitor market conditions: High volatility may warrant isolated margin for safety.
-
Review DEX settings: Ensure you understand how to switch modes on your chosen platform.
Set initial margin and leverage limits
Configuring your onchain perpetual futures position begins with defining the boundary between your risk and your exposure. Margin is the collateral you deposit to back a trade, while leverage multiplies your market position relative to that deposit. Setting these parameters correctly prevents liquidation during normal volatility and ensures your capital allocation aligns with your strategy.
1. Determine your maximum loss threshold
Before opening a position, decide the absolute amount of collateral you are willing to lose. This figure should be a fraction of your total portfolio that you can afford to lose without impacting your financial stability. Your initial margin must be large enough to absorb potential drawdowns up to this limit before the smart contract triggers a liquidation event.
2. Calculate the required initial margin
The initial margin is the minimum collateral required to open the position. It is calculated by dividing the notional value of the position by your chosen leverage multiplier. For example, if you want a $1,000 position with 5x leverage, you must deposit $200 in margin. Ensure your wallet holds enough of the required collateral asset to cover this amount plus network gas fees.
3. Select a conservative leverage multiplier
High leverage amplifies both gains and losses. Onchain platforms often allow leverage up to 50x or 100x, but using maximum leverage leaves almost no room for error. A 3x to 5x leverage range is generally safer for most traders, as it reduces the likelihood of being liquidated by minor price wiggles or slippage. Treat leverage as a tool for efficiency, not a guarantee of profit.
4. Verify margin requirements on the interface
Review the platform’s margin calculator before confirming the transaction. Different perpetual protocols may have varying maintenance margin requirements or funding rate structures that affect your effective cost. Ensure the displayed initial margin matches your calculation and that you understand the liquidation price the system will assign to your position.
Navigate to the perpetual futures section of your chosen DEX. Connect your wallet and select the trading pair you intend to trade, such as ETH/USD or SOL/USD.
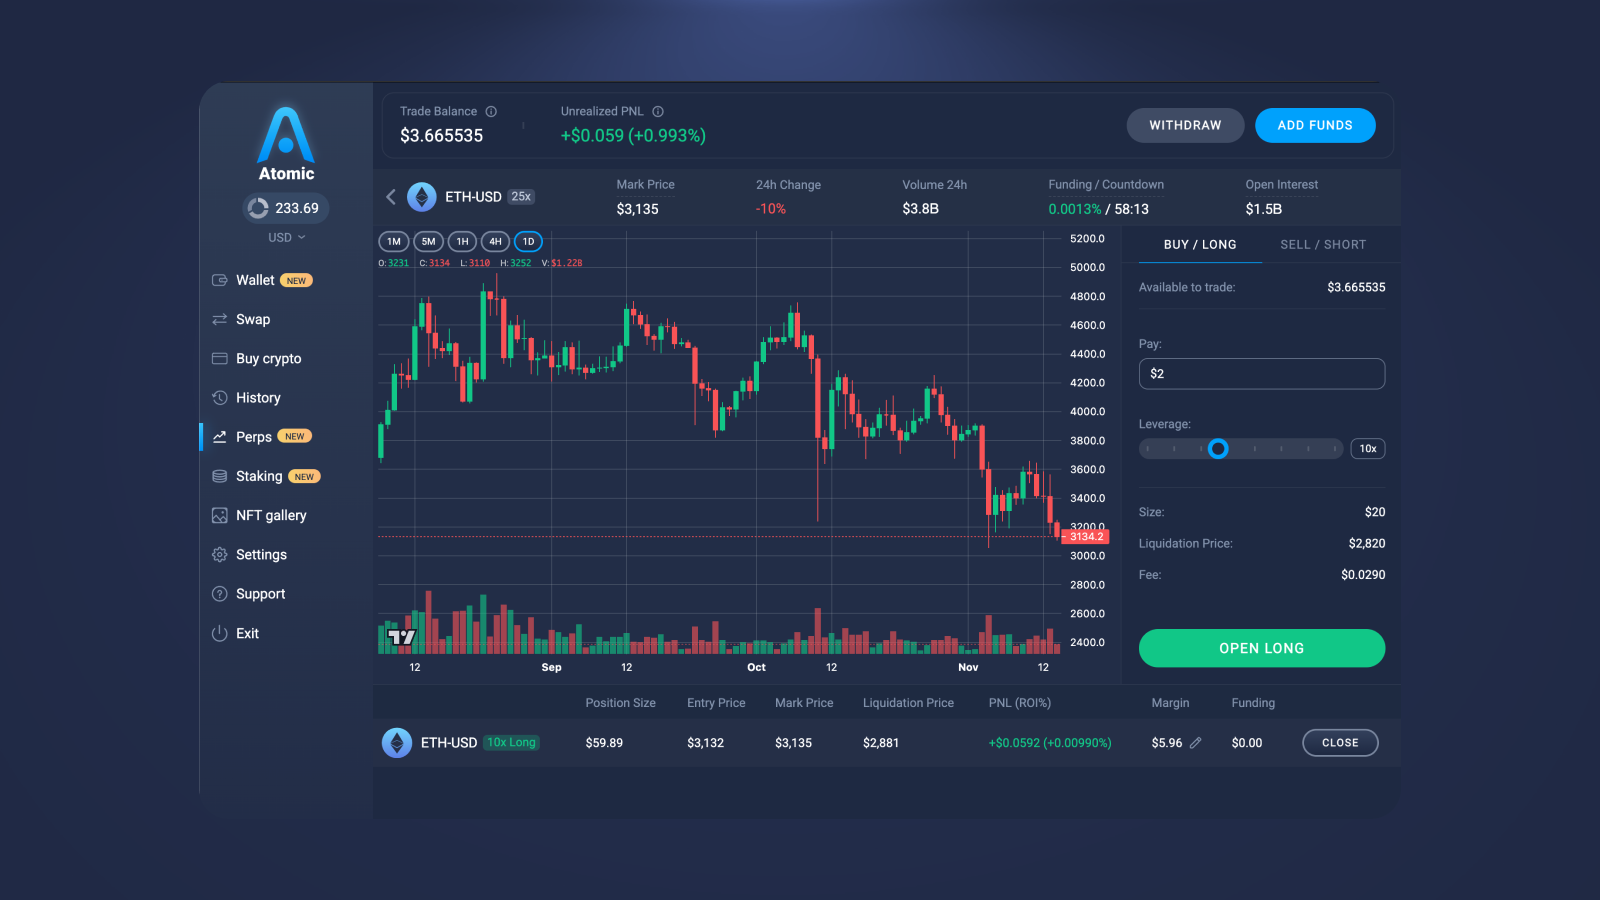
Enter your desired notional position size. The interface will automatically calculate the required initial margin based on your selected leverage. Adjust the leverage slider to a conservative level, typically between 3x and 5x.
Verify that your wallet contains sufficient collateral to cover the initial margin and the estimated gas fees for the transaction. Check the liquidation price to ensure it is at a safe distance from the current market price.
Monitor real-time liquidation prices
Liquidation prices on onchain perpetuals are not static; they shift with every tick of the underlying asset and every change in your open interest. Unlike centralized exchanges that may update risk parameters on a delay, onchain protocols recalculate mark prices and liquidation thresholds in near real-time. Failing to track these moving targets is the fastest way to lose your margin to a flash liquidation.
To manage this risk, you must treat your liquidation price as a live metric, not a one-time setting. The following steps outline how to monitor your exposure and adjust your position proactively.
Begin by accessing the interface where your position is displayed. Whether you are using a native DEX UI or a third-party aggregator, identify the "Positions" or "Portfolio" tab. Here, you will see your entry price, current leverage, and the dynamic liquidation price. This dashboard is your primary source of truth; ensure you are viewing the "Mark Price" rather than the "Last Traded Price," as liquidations are triggered against the mark price to prevent manipulation.
Relying on manual checks is insufficient for fast-moving markets. Configure price alerts that trigger when the asset price reaches 90% of your liquidation distance. Tools like HyperTracker or native protocol notifications can push alerts to your device. These alerts give you the critical minutes needed to add margin or reduce position size before the protocol executes a forced liquidation.
Determine the exact price movement required to wipe out your position. If you are using 10x leverage, a 10% adverse move triggers liquidation, but fees and funding rates eat into this buffer. Use a calculator or the platform's built-in risk tool to see the "margin call" price versus the "liquidation" price. Aim to keep your liquidation price at least 5-10% away from the current market price to account for volatility spikes.
If your liquidation price is too close to the current market price, you have two options: reduce your position size or deposit additional margin. Reducing size lowers your leverage and moves the liquidation price further away. Adding margin increases your collateral ratio. Choose the action that aligns with your market view; if you still believe in the trade, add margin. If the thesis is weakening, cut the position.
Add collateral during volatility spikes
Market volatility is the primary threat to onchain perp margin efficiency. When price swings accelerate, your liquidation threshold drops rapidly, even if the underlying trend remains in your favor. Adding collateral during these spikes is not just a defensive move; it is a mechanism to maintain position health without forced exits.
The process relies on the specific margin mode configured in your smart contract. Most perpetual DEXs support both cross-margin and isolated margin options. Cross-margin allows you to pool funds across positions, providing a buffer that can absorb broader market shocks. Isolated margin limits risk to a specific position but requires more frequent, targeted top-ups when that specific asset becomes volatile [LCX].
To add collateral effectively, follow this sequence:
By treating margin additions as a routine part of your trading workflow rather than an emergency response, you maintain control over your positions. This approach minimizes the risk of forced liquidations and allows you to stay in the trade through temporary market turbulence.
Avoid common margin mistakes
Efficient onchain perp margin management requires vigilance against two frequent errors: underestimating funding fees and misunderstanding cross-margin interactions. These mistakes can erode capital quickly, especially during volatile market conditions.
Underestimating funding fees
Funding fees are periodic payments exchanged between long and short traders to keep the perp price aligned with the spot price. Many traders focus solely on price direction while ignoring the cost of holding a position over time.
During high-volatility periods, funding rates can spike. A long position held for days during a bullish trend might incur substantial fees that outweigh price gains. Always check the current funding rate before entering a trade and factor it into your profit/loss calculations.
Ignoring cross-margin interactions
Cross-margin mode shares your entire account balance across all open positions. While this reduces the risk of liquidation for individual trades, it exposes your full balance to the risk of any single position failing.
If one position is liquidated, the loss is deducted from your total margin. This can lead to a cascade of liquidations if multiple positions are correlated. To mitigate this, consider using isolated margin for high-risk trades or diversifying your portfolio to reduce correlation risk.

No comments yet. Be the first to share your thoughts!