Choose cross or isolated margin first
Onchain perpetual futures platforms typically offer two margin modes: cross and isolated. Selecting the right one is the first decision in your setup, as it determines how your collateral behaves when markets move.
Cross margin uses your entire account balance to support open positions. This mode is capital-efficient because it pools risk, allowing profitable trades to offset losses in others. It is best for strategies where you want to minimize the chance of a single position triggering a liquidation.
Isolated margin assigns a fixed amount of collateral to each position. If a trade goes against you, only that specific allocation is lost. This mode contains risk, making it safer for volatile trades or when you want to limit exposure to a single market. It prevents a bad bet from draining your entire account.
| Feature | Cross Margin | Isolated Margin |
|---|---|---|
| Collateral Source | Entire account balance | Fixed amount per position |
| Risk Profile | Lower liquidation risk per trade | Higher liquidation risk per trade |
| Capital Efficiency | High (shared across positions) | Low (capital tied up per trade) |
| Best For | Multi-position strategies | Single-trade risk containment |
The choice depends on your strategy. If you trade multiple positions simultaneously, cross margin reduces the need to constantly rebalance collateral. If you trade large, volatile positions, isolated margin protects your remaining capital.

Calculate initial and maintenance margins
To manage onchain perp margin effectively, you must first determine the exact collateral required to open a position. This calculation relies on three variables: your desired position size, the current mark price, and the leverage you intend to use.
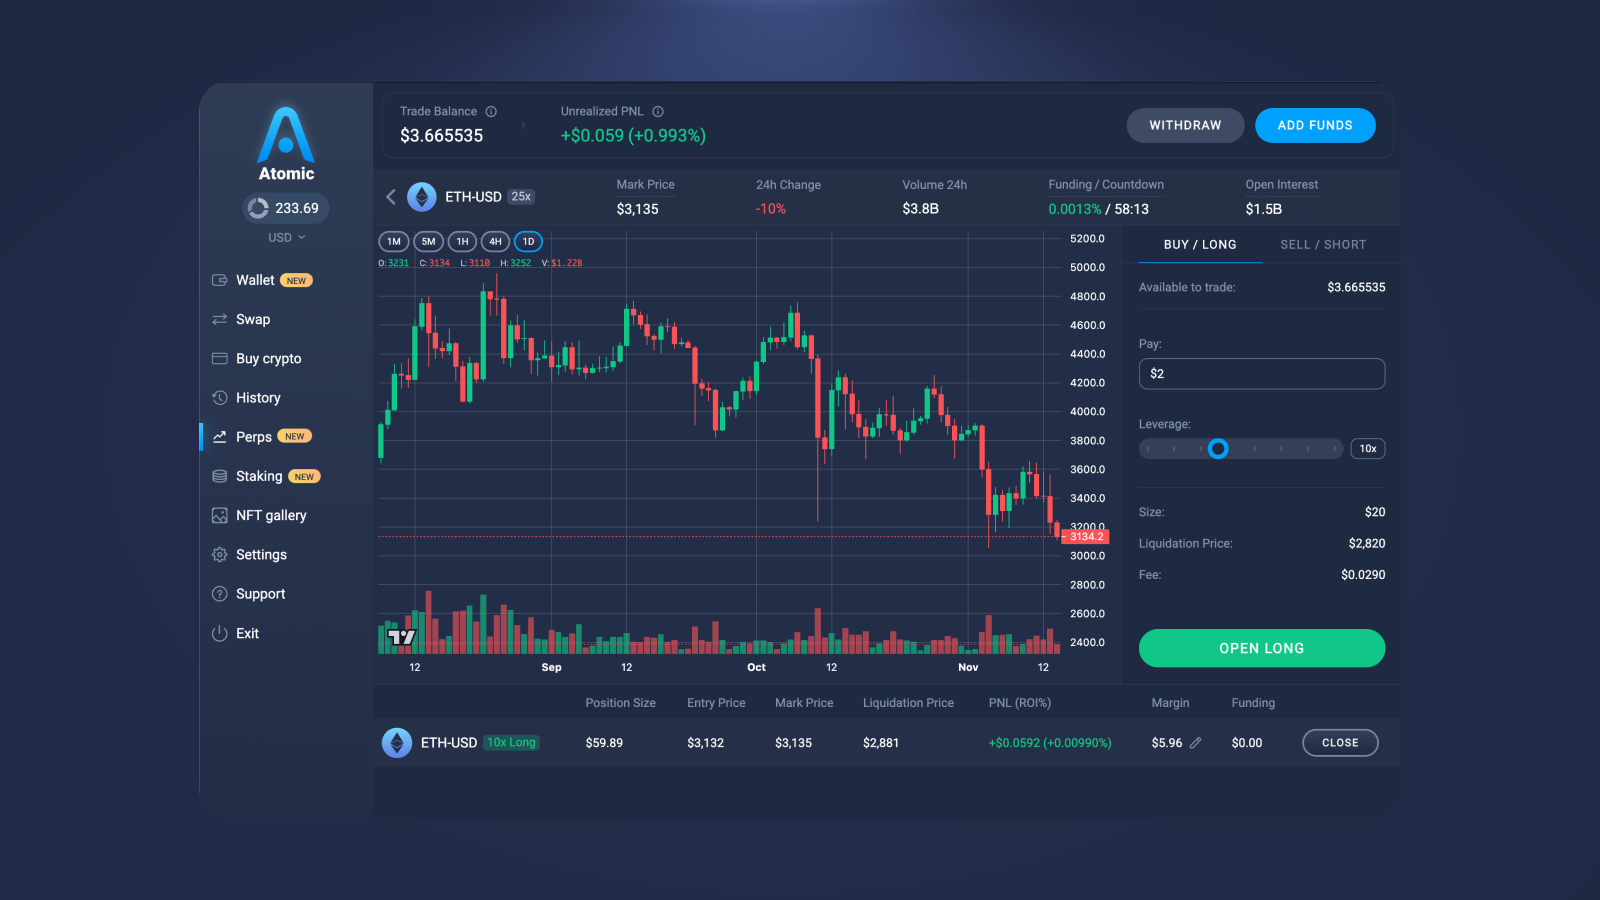
Decide the total value of the position you want to control. For example, if you have $1,000 in collateral and want to use 10x leverage, your total position size is $10,000. This is the amount of the asset you are effectively buying or selling on the perp DEX.
Divide your total position size by your chosen leverage to find the initial margin. Using the previous example: $10,000 (position size) / 10 (leverage) = $1,000 (initial margin). This $1,000 is the amount locked in your wallet to open the trade.
Every perp protocol sets a maintenance margin requirement, typically between 0.5% and 5% of the position size, depending on the asset's volatility. This is the safety buffer. If your account equity falls below this level, the protocol will liquidate your position to cover losses.
Understanding the difference between initial and maintenance margin is critical for risk management. Initial margin gets you into the trade; maintenance margin keeps you in it. A sudden price drop can wipe out your initial margin and trigger liquidation if you haven't accounted for the maintenance threshold.
Bridge assets to the target chain
Your collateral must live on the same blockchain as the perpetual DEX. If you are trading on Solana-based platforms like Zeta Markets, your funds need to be on Solana. If you are using an Ethereum L2 solution, your assets must be on that specific L2.
Cross-chain bridging is the most common point of failure for new traders. Sending USDC from an Ethereum mainnet wallet directly to a Solana address will result in lost funds. Always verify the destination chain network before initiating any transfer.
Choose a bridge that supports your specific source and destination chains. For high-value transfers, use established protocols like LayerZero or Wormhole integrations found on major aggregators like Jumper or Stargate. Avoid obscure bridges with low total value locked (TVL), as they carry higher smart contract risk.
Bridge fees consist of the protocol fee and the destination chain gas. Some bridges charge a flat fee, while others take a percentage of the transferred amount. Ensure your source wallet has enough native gas tokens (ETH, SOL, MATIC) to cover the withdrawal and any intermediate steps. Factor in a 1-2% slippage buffer for price movements during the transfer window.
Do not assume the transfer is complete until the funds appear in your destination wallet. Bridge transactions can take anywhere from 30 seconds to 15 minutes depending on network congestion. Once the funds arrive, check that the token contract address matches the native asset on the target chain. Some bridges wrap assets (e.g., bridged USDC vs native USDC), and perps DEXs often require the native version for optimal pricing.
Monitor funding rates and liquidation prices
Perpetual futures rely on two moving parts that can drain your margin unexpectedly: funding rates and liquidation thresholds. While funding rates keep the contract price tethered to the spot market, liquidation prices define the hard floor where your position gets forcibly closed. Managing onchain perp margin requires watching both metrics in real time.
Track funding rate drift
Funding rates are periodic payments exchanged between long and short traders to keep the perp price aligned with the spot index. When rates are positive, longs pay shorts; when negative, shorts pay longs. In trending markets, these rates can drift significantly, turning a profitable trade into a losing one due to recurring fees.
Monitor the funding rate clock on your trading interface. If the rate spikes unusually high, consider whether the fee cost outweighs your expected price movement. Some protocols allow you to view historical funding data to gauge volatility. Avoid holding large leveraged positions during periods of extreme rate divergence unless you have a specific hedging strategy in place.
Watch your liquidation price
Your liquidation price is the mark price at which your position is automatically closed to cover losses. It is not a fixed number; it moves as the asset price changes and as your collateral balance shifts. On cross-margin accounts, liquidation can sweep your entire wallet balance, while isolated margin limits the loss to the specific position.
Use a technical chart to visualize the gap between the current mark price and your liquidation price. A narrow gap indicates high risk, especially in volatile markets. Keep a buffer between your entry and liquidation price. If you are trading on cross-margin, monitor your total portfolio health factor. If you are using isolated margin, ensure you have enough collateral in that specific position to absorb normal market swings. Never set your liquidation price so close to the current mark that a minor wick triggers an exit.
Review your margin setup with a checklist
Before executing a trade, verify your risk parameters across the chain. A quick audit prevents costly liquidations caused by bridging errors or mismatched margin types.
Decide between isolated and cross margin. Isolated margin limits loss to the collateral allocated to a single position, while cross margin uses your entire wallet balance. If you are new to cross-chain trading, isolated margin is often safer to contain risk.
Ensure your collateral is settled on the target chain. Bridging delays or failed transactions can leave your position undercollateralized. Check the balance directly on the dApp rather than relying on bridge explorer estimates.
Confirm your liquidation price is far enough from the current mark price. Initial margin requirements depend on your leverage; for example, a $10,000 position at 10x leverage requires $1,000 in initial margin. Set stop-losses accordingly.

Review the current funding rate. Positive rates mean longs pay shorts; negative rates mean shorts pay longs. High funding rates can erode your margin over time, so factor this cost into your holding period.
-
Margin type (isolated vs. cross) selected
-
Collateral bridged and confirmed on-chain
-
Liquidation price noted and stop-loss set
-
Funding rate checked for holding costs
Common questions about perp margin
Perpetual futures contracts rely on two specific numbers to keep your position open: initial margin and maintenance margin. Initial margin is the collateral required to open a trade, while maintenance margin is the minimum balance you must hold to avoid liquidation. Understanding these thresholds is essential for managing risk across different chains.
What is the margin in perps?
Margin is the collateral you deposit to open and maintain a leveraged position. The initial margin is calculated as position size x mark price ÷ leverage. For example, opening a $10,000 position at 10x leverage requires $1,000 in initial margin. If your account balance falls below the maintenance margin threshold, the exchange will liquidate your position to cover losses.
What is leverage in crypto perps?
Leverage allows you to increase your trading exposure compared to the amount you deposit. With 10x leverage, a $1,000 deposit lets you control a $10,000 position. This amplifies both potential profits and losses. Higher leverage reduces the amount of margin needed to open a trade but significantly increases the risk of liquidation if the market moves against you.
No comments yet. Be the first to share your thoughts!