
Set up your cross-chain perp wallet
Onchain perpetuals require a self-custody wallet capable of signing transactions across multiple networks. Unlike centralized exchanges, you manage your own private keys and margin assets directly. This setup gives you full control over your capital but demands careful configuration to avoid failed transactions or stranded funds.
Download a non-custodial wallet like MetaMask. Verify the official download link to avoid phishing sites. During installation, securely back up your seed phrase offline. Never store it digitally or share it with anyone.
Onchain perps live on specific blockchains, such as Solana or Ethereum L2s. Add the correct network RPC details to your wallet. If your chosen DEX operates on multiple chains, ensure your wallet supports all relevant networks where you plan to hold margin.
Transfer the native token of each chain to your wallet address. These tokens pay for gas fees. For example, you need ETH for Ethereum-based perps or SOL for Solana-based ones. Keep a small buffer of gas tokens separate from your trading margin.
Before depositing assets, you may need to approve the perp contract to spend your tokens. Use official dApp interfaces to set these allowances. Start with small amounts to test the flow. Review contract permissions regularly to revoke unnecessary access.
With your wallet configured and funded, you are ready to connect to a perp DEX. Always verify the contract address on the official DEX website or through trusted aggregators like Nansen before interacting with any smart contract. This verification step is critical for preventing fund loss.
Calculate initial margin requirements
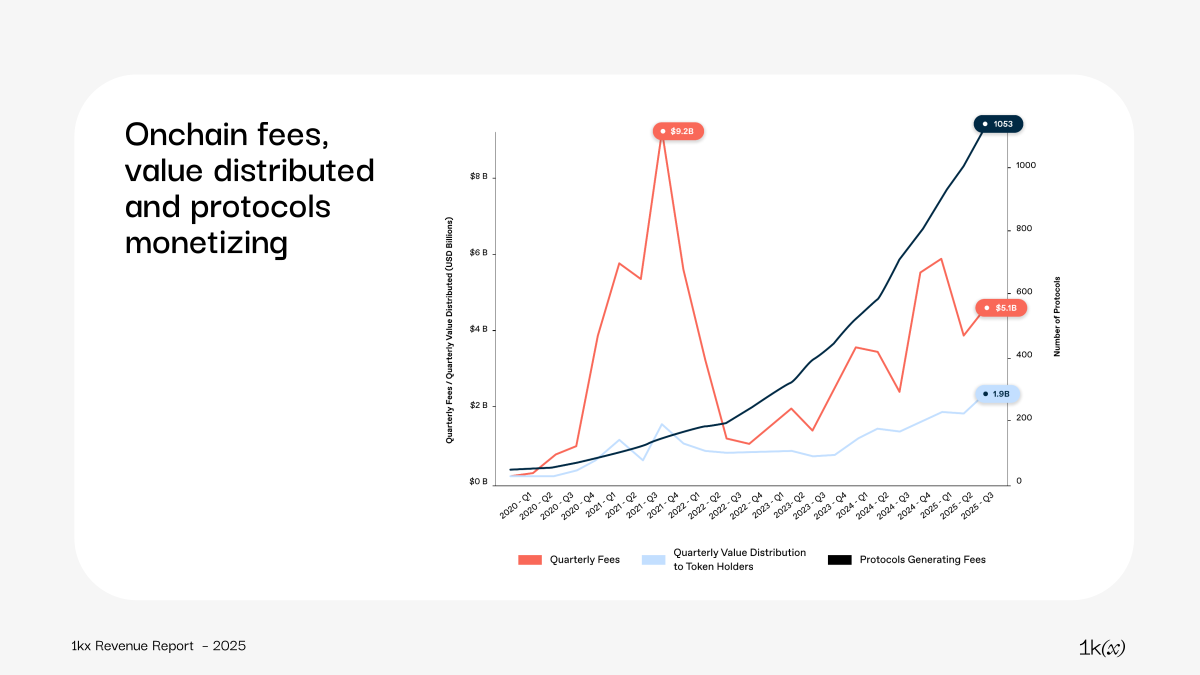
Onchain perpetual futures have captured 14.9% of total trading volume, shifting the landscape toward decentralized leverage tools that require precise margin management [1]. To avoid immediate liquidation, you must calculate the exact initial margin needed for your position size and leverage before opening a trade. This calculation determines the collateral you must lock in your wallet to establish the position.
The foundation of this calculation relies on the relationship between leverage and position size. Leverage amplifies your exposure but reduces the percentage move required to trigger a liquidation event. For instance, if you post $1,000 of margin with 10x leverage, you control a $10,000 position [2]. A 1% adverse move against you would result in a $100 loss, which is 10% of your initial margin [3]. Understanding this multiplier is essential for sizing your margin correctly.
To determine your initial margin, divide your desired position size by your chosen leverage ratio. If you want to control $50,000 worth of assets with 5x leverage, you need $10,000 in initial margin ($50,000 / 5). Some platforms also require a maintenance margin, a smaller amount of collateral that must be retained to keep the position open. If your account balance drops below this threshold, the platform will liquidate your position to cover losses.
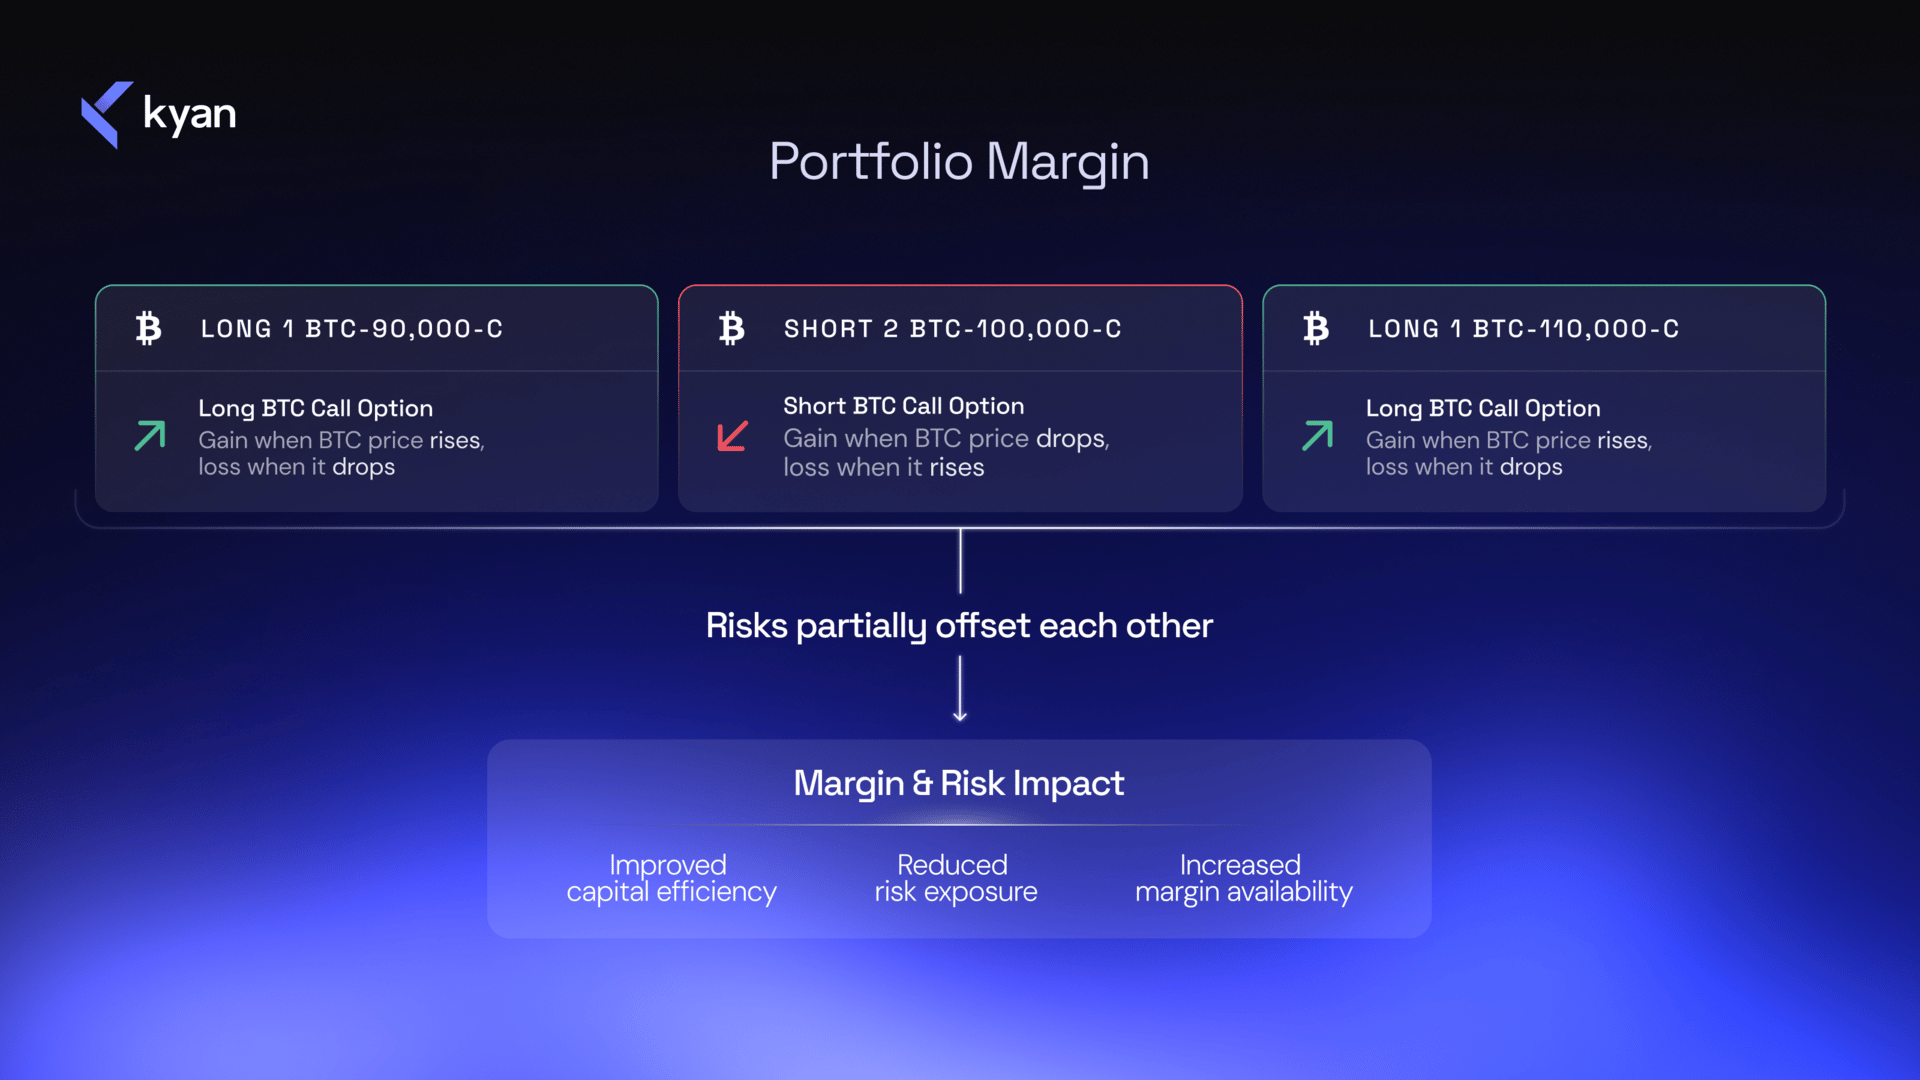
When calculating your margin, always account for trading fees and funding rates. These costs reduce your available collateral over time, effectively increasing your liquidation price. Onchain platforms often display these costs in real-time, allowing you to adjust your margin or leverage accordingly. Always verify the platform's specific margin requirements, as they can differ significantly between assets and market conditions.
Configure dynamic liquidation shields
Onchain perpetual protocols handle massive volume—Hyperliquid alone moved $170–$200 billion monthly in 2026—making automated liquidations both efficient and unforgiving. Without dynamic shields, a single flash crash can wipe out a position before you can react. Setting up dynamic thresholds means adjusting your liquidation price based on real-time volatility rather than static parameters.
Locate the margin configuration panel in your trading interface. Set your base liquidation price at a level that provides a standard safety buffer (typically 3–5% below entry for isolated margin). This is your floor; if volatility spikes and price approaches this line, the protocol will begin the liquidation process. Ensure this price aligns with your maximum acceptable loss threshold.
Activate dynamic liquidation features if your protocol supports them. Many 2026-era DEXs allow you to link your margin parameters to volatility indices (like IV or historical ATR). When volatility rises, the protocol automatically widens your liquidation buffer or reduces leverage to prevent premature liquidation during noise. This keeps your position open during standard market fluctuations.
Set a hard stop-loss order that executes independently of the protocol’s liquidation engine. While dynamic shields protect against volatility, they do not replace risk management. Place a stop-loss at a price level that limits your loss to a predefined percentage of your capital (e.g., 2% of account balance). This ensures you exit the market before liquidation fees or slippage erode your remaining equity.

Review your shield settings weekly or after major market events. Volatility regimes change; a shield that worked during a calm period may be too tight during a breakout. Adjust your dynamic parameters to match current market conditions. If you are not using automated volatility links, manually adjust your stop-loss and liquidation prices to reflect new support/resistance levels.
Monitor real-time market data
Tracking your onchain perp margin requires watching live price action and volatility. Static snapshots fade quickly; you need to see how funding rates and liquidation levels shift as the market moves.
Start by pinning a live TechnicalChart for your primary asset. Watching the candlestick pattern alongside volume bars helps you spot exhaustion before a liquidation cascade. If you are holding a long position, a sudden drop in volume during a price rally often signals a weak move that could reverse. Don’t rely solely on the chart. Set up alerts for key support and resistance levels. Most onchain perps platforms allow you to set notifications for price thresholds or funding rate flips. This lets you step away from the screen without missing a margin call warning.
Execute trades with capital efficiency
Onchain perpetual futures allow you to open leveraged positions directly from your wallet without an order book intermediary. To trade effectively, you must manage your margin carefully to avoid liquidation while minimizing gas costs. This section guides you through the execution phase, focusing on maximizing the utility of your deposited capital.
Most onchain perps require specific collateral, such as USDC, USDT, or the native chain token. Check the protocol’s collateral requirements before initiating a transfer. Depositing the wrong asset often results in failed transactions or unnecessary swap fees. Ensure your wallet has sufficient native tokens (like SOL or ETH) for gas fees on top of the margin amount.
Determine your entry price, position size, and leverage ratio. Higher leverage increases potential returns but also raises liquidation risk. For example, 10x leverage on $1,000 of margin creates $10,000 in exposure. Use a calculator to estimate your liquidation price based on the protocol’s maintenance margin requirements. Always account for funding rates, which can erode profits over time.
Before confirming, inspect the estimated gas fees and slippage tolerance. Onchain perps often use limit orders to reduce slippage, while market orders execute immediately at the best available price. Some protocols, like Hyperliquid, offer lower fees for limit orders. Set your slippage tolerance appropriately—too low and your trade may fail; too high and you may suffer significant price impact.
Once you sign the transaction, the position is recorded on-chain. Monitor your account health factor or margin ratio in real-time. If your position moves against you, you may need to add more margin to avoid liquidation. Some platforms allow you to adjust leverage or close positions directly from the dashboard. Keep an eye on funding rates and market volatility to manage risk proactively.
Review and adjust your margin strategy
Your margin plan is a living document, not a set-it-and-forget-it configuration. As onchain perpetual futures capture 15% of total volume, liquidity can shift rapidly between centralized and decentralized venues, requiring active oversight to prevent slippage or liquidation events.
Start by auditing your open positions against current volatility regimes. If the market has entered a high-volatility phase, your existing buffer may no longer be sufficient. Adjust your margin levels proactively rather than reacting to margin calls. This means either adding collateral to strengthen your position or reducing leverage to lower your risk exposure.
When closing trades, prioritize safety over speed. Use limit orders where possible to avoid unfavorable slippage, especially in lower-liquidity pools. Before executing any major adjustment, run through this final checklist to ensure you haven’t overlooked a critical parameter.
Frequently asked questions on perp margin
How is liquidation calculated on-chain?
Liquidation occurs when your margin balance falls below the maintenance requirement. On-chain protocols monitor this in real time. If your collateral value drops due to market movement, the protocol will automatically close your position to cover losses. This prevents the debt from spreading to other users. The exact threshold depends on the specific perp market’s rules and current volatility.
Why use onchain perp margin instead of CEXs?
On-chain perp margin offers transparency and self-custody. You hold your keys, and the smart contract logic is visible to everyone. Centralized exchanges (CEXs) keep your funds in their internal ledgers, which introduces counterparty risk. While CEXs may offer higher leverage, on-chain platforms prioritize auditability and direct control over your collateral.
What happens to my margin if I’m liquidated?
When liquidated, your posted margin is used to cover the position’s losses and liquidation fees. Any remaining collateral is returned to your wallet. If the loss exceeds your margin, you may still owe the difference depending on the protocol’s insurance fund mechanics. Always keep extra buffer capital to avoid sudden liquidations during high volatility.
Can I withdraw my margin while a position is open?
No. To maintain an open position, you must keep sufficient collateral in the contract. Withdrawing margin reduces your available collateral, which may trigger a liquidation if it falls below the maintenance level. You must close the position first to fully withdraw your funds.
No comments yet. Be the first to share your thoughts!